
Show Permissions define which fields are shown after opening a specific Transaction or record in a Definition. If your employees do not have any Show Permissions granted, they will only see a blank screen after opening a Transaction.
General setup
Name (internal) – mandatory, just an internal name for this particular form that will make the administration of all Show Permissions readable for other administrators
Description – optional, to further describe the purpose of these permissions for other administrators to better understand
Active? – if not checked, the Show Permissions will not be applied
Definitionable model – mandatory, choose among the options – if you are setting up the permissions for the Transactions, or the records of any of the Definitions
If you chose Transaction, you will need to fill in the following information:
Hide previous/next buttons – when you have a Transaction opened, buttons to navigate to the previous or next Transaction will hide
Show download button for transaction detail – the download button in the top right corner will appear
Reverse actions – by default, the actions in Transaction timeline are sorted from the oldest to the most recent ones. This checkbox can reverse the order to have the most recent ones on top of the list
Locking disabled – if the locking is enabled (by default) then User has to first click on “Lock transaction and make action” in order to change Transaction’s Status
Always show full status history – the whole history of the Transaction is shown at all times, no matter if the workflow progress diagram is set up (see more in our Status Groups article)
Show copy button – a button to copy the values in the fields will be shown after hovering on the field


If conditions are met
Which conditions have to be met for these permissions to work.
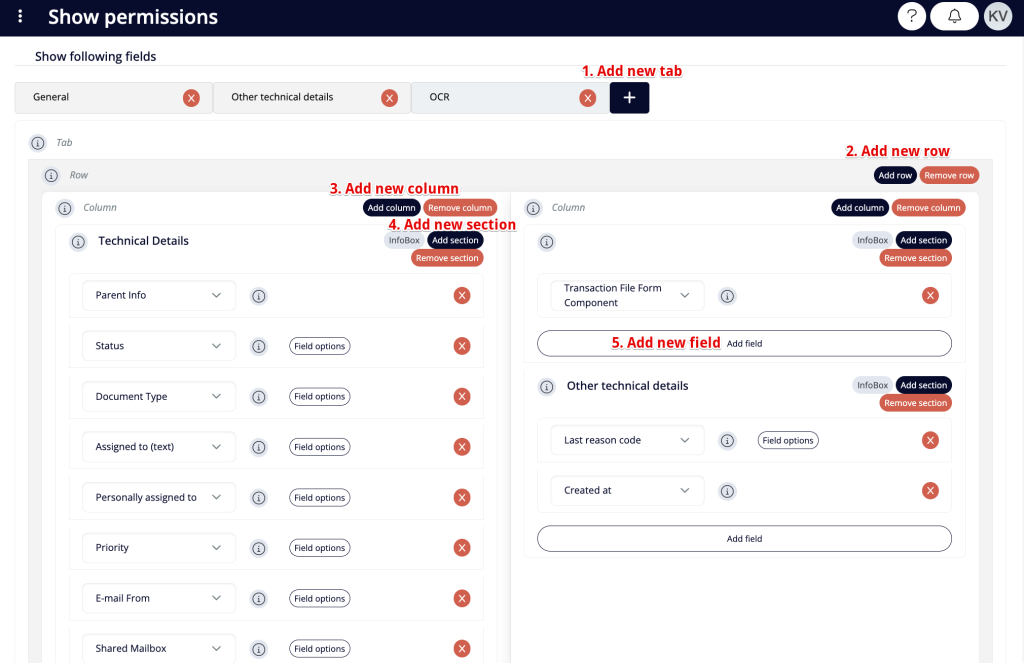
Show following fields
In this section, you will design what the form looks like. You can add new tabs, rows, columns, sections, and fields.
First, you need to add a new tab by clicking on the big ‘plus’ button. When you click on the tab, you need to add at least one new row by clicking on the big “Add row” button. Then you have to add a new column by clicking on the “Add column” button, then “Add section”, and then, finally, you can add new fields. You can add as many tabs, rows, columns, sections, and fields as needed.
Show these tabs (only for Transactions)
Show actions – the section below Transaction details showing the change of Statuses and Transaction information
Show data entry logs – the section below Transaction details showing logs from data extraction
Show children actions – the section below Transaction details showing actions for each of the children’s Transactions


User is in group
Which Groups can see given fields in the Transactions or Definitions once the above-mentioned conditions are met. If no Group is selected, all of the Groups will be given the permission.
By combining correct conditions and Groups, you can guarantee every Group of Users can see only those fields they are allowed to see. For example, you can set up one Show Permission for top management to see every field on the Transaction, second Show Permission for lawyers to see only legal information, etc.

